There is a lot of debate around this subject. I have found that the teachers who get the best results have fairly similar processes. I have collated the material in this article from various sources, namely from teachers and performers who come from the traditional Italian/Swedish classical school of training. The same breathing technique applies across the board for ALL styles. Placement, laryngeal function and style changes between genres, but correct breathing is always the same no matter what.
Firstly, breathing and support needs to be simplified to two steps:
- You breathe in
- You sing (and support while you sing)
Ok, let’s break it down a little more:
- You breathe in
- You support as you sing
- You breathe in
Breathing in = When you release
Breathing out and singing = When you support
I want you to imagine a relay race. Person 1 is running towards person 2 with a baton. When person 1 is running, person 2 is waiting. When Person 1 approaches person 2 however, the latter starts to run slowly. They then take over as person 1 comes to a stop.
Release and support can be treated in the same way. You need to think of them in isolation first. As one ends and the other begins, there is a very slight taking of the reigns as you seamlessly move from one step to the next. You do not ‘deactivate’ unless there is a large gap between two phrases.
1. The Release
Many, many singers get this bit very wrong. They believe that you need to ‘suck in’ to breathe quickly and to fill the lungs as much as possible.
You DO NOT need to suck in air quickly. As a rule, the quieter the breath, the better the inhalation. Your lungs take air in because they are a vacuum.
The lungs work very simply:
- Your brain sends a signal to the diaphragm and external intercostal (rib) muscles to contract.
- The diaphragm goes down and the ribs will elasticise upwards and downwards (wide ribs will lock your breath), increasing the volume in your thorax (chest).
- When this happens, the air pressure inside your thorax is now less than the air pressure outside of your body.
- Your lungs take in as much air as they need.
So how do we make this happen properly?
One way of doing this is by dropping your jaw and breathing in as if you just saw something that surprised you. This should not be a gasp, but an intake of breath as if you were going to say “oooh!” You should instantly feel the air flow into your lungs freely and without effort.
Breathing in is a natural process. We do need a little extra air in order to optimize our phrasing, so this is where our exercizes and healthy posture come in.
“Breathing from the Diaphragm”
This is something that a lot of teachers say, but never explain.
When you breathe correctly for singing, your diaphragm should descend. Here’s a diagram of the thorax:
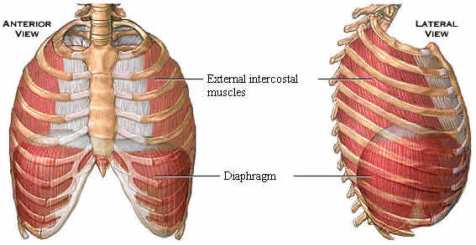
What do you think sits under the diaphragm? Organs! If the diaphragm goes down, what will this cause them to do? It will cause them to move outwards. This will make the abdomen expand. This is what teachers mean when they say ‘breathe into your tummy.’ Please, DO NOT try to force out or bloat your tummy when you breathe in. When you do this, you are tensing your abdominal muscles. Instead, these muscles need to be FULLY RELAXED when you inhale.
Also, do not try to SUPPORT from these muscles or any other muscles as you are breathing in. You will stop the flow of air and the air pressure will be too low. This is very common with young or new singers who always stick their hands over their tummy when they want to try and breathe ‘with their diaphragm’. Notice how these singers often run out of breath and sound ‘breathy’ when they sing.
Ok, so let’s simplify what I have said:
Breathing is:
- Being like a vacuum, letting the air rush in with a little help from the ribs expanding upwards and downwards (we will discuss this with posture)
- Letting your diaphragm descend, which means relaxing your abdominal muscles
Exercize 1: The backwards ‘ssss’
- With your teeth closed, but not clenched, breathe in as if you were doing a backwards ‘sssss’. Make sure the tip of your tongue stays on the back of your bottom teeth at all times.
- Do this for about 3-4 seconds
- After 3-4 second, drop your jaw and let the rest of the rush in
- Only fill up to the point where your ribs move a part and your tummy goes out, but don’t go beyond this point. Your lungs and ribs should feel as if they could easily ‘bounce inwards’. You will also feel as if your throat is open.
- If you feel as if you are forcing air in, then you have breathed in too much.
- Blow all air out with your lips in an ‘ooooh’ shape
- This last step is just to continue giving you the sensation of an open throat and to let the lungs ‘rebound’. When you actually sing you will not do this.
Exercize 2: The leg wiggle
- Be in a standing position.
- Near the end of your phrase, start to shake one leg to the side. You will be slightly off balance
- Keep shaking the leg as you breathe.
- You can return the leg to the ground at the start of each phrase.
When you do this, you should notice a slight (not extreme) flaring of your floating ribs (bottom ribs). This is because when your body is thrown off balance, you will naturally take more air in without over-filling.
The above exercize will also help you lift your soft palate.
2. Support
Support is simply what you do to regulate the outward flow of breath as you sing. You do not want too much air leaving the lungs, but you also want your body to be actively connected to the breath so that it will assist when you need more air pressure.
Imagine that when the diaphragm is fully contracted, it is like a flat piece of elastic over a hole. Your support muscles (internal intercostal, external obliques and transverse abdominus) are responsible for keeping the diaphragm taut. This prevents the diaphragm from relaxing (and pushing the air out) too fast. As a result, you have a steady outflow of breath.
What support IS NOT:
- Forcing air out on high notes (i.e support that note more). When you get it right, this will be automatic. You should never actively force more air out on high notes.
- Supporting from your diaphragm. This is a terrible myth. You cannot support ‘from your diaphragm’. Your diaphragm can only contract (which makes the lungs expand) and relax (which happens when air leaves your lungs). The rate at which your diaphragm relaxes is controlled by your support muscles. These are other muscles, not the diaphragm.
- Punching your solar plexus. This is a dangerous method that some teachers use. They will plant their fist near your solar plexus and push it. This does not support your air flow, this simply forces too much air out and tightens the abdominals.
- Sucking your tummy inwards. Your tummy will feel as if it is going inwards on its own and it should feel actively involved with singing. However you should not force this. If your posture is correct, your tummy will automatically go inwards and upwards without you having to do much.
Support is:
- Being in an excellent posture so that the correct muscles are able to work on regulating your breath
- Using your back and oblique muscles to help keep the rib cage expanded
- Using your intercostals muscles of the ribs to keep them toned for gradual release of air
- Being in an excellent posture so that the sternoclydomastoid muscles (side of the neck) are taut, but not tense, which allows for laryngeal tilt and for an open throat
- Allowing your abdomen, back, oblique and intercostals muscles to change the air pressure needed depending on the demands.
It is important that you know that support should be something that you are not thinking about all the time. It should be a learned response. This means you need to practice it outside of your music. When you are singing, you need to use your physical exercizes to engage the support so you are not thinking about it. Eventually, whenever you sing, you will notice that you are always supporting, and you will know when you are not.
How Support should feel:
It will feel different for many people. The best singers I know tend to talk about a ‘kicking’ from the lower and upper abdomen when they sing. This kicking may happen over and over again during a phrase if you are going through a difficult phrase
A lot of singers will note that through a phrase, their sternum will kick as well. This is the bone in the middle of your chest that some of your ribs are attached to. Female singers may notice that their breasts may bounce a little because of this. I am not trying to be vulgar, but it is a common thing. Dame Sister Mary Leo, a renowned New Zealand teacher whose students were Dame Kiri Te Kanawa and Dame Malvina Major was known to say that she always wanted to see the breast and chest area active when her students sang. This was because the rib cage is directly associated with support and will naturally activate through phrases.
Singers may also notice a tautness in their side muscles just above their hips (obliques) and lower back. This feeling is not unlike pulling a horizontal bar down from above. You can also feel this sensation by performing the ‘hugging the tree’ exercize discussed below.
Whenever you get the opportunity, ask your teacher or a singing friend to place their hands at the bottom of your posterior rib cage. When you fill, they should feel their hands move outwards, away from each other. As you sing, their hands should barely move from that place. You will also benefit from doing the same with your colleagues or teachers.
How support looks:
Watch the singer in the following video. You will see the abdomen ‘kick upwards’ at the very start of the note. It is sustained right through the entire note. A good support will result in this kind of longevity:
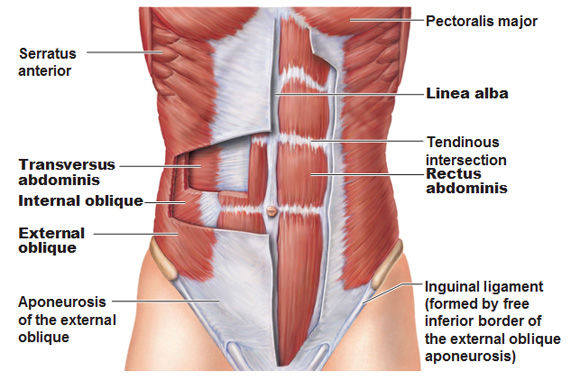
What causes everything to ‘lift up’ from the lower abdomen?
I want you to look at the picture below. When we are focusing on keeping our ribs expanded, our external obliques will contract – we will feel this sensation in the back as well as the sides. From the front, you will notice a sheet of white tissue that goes around the lower abdomen like a V. This is the aponeurosis of the external oblique. This is a bit like a basket that contains all of your abdominal material. When the external obliques are correctly tort, they will pull at this aponeurosis, which is what causes that ‘kick’ in the lower abdomen when correctly supporting.
Warning: The Deadly Ab-clench:
There are so many people who think that supporting is keeping your abs clenched. As if you were taking a poo or doing a sit up. Normally, the student will do this when they are told by a teacher to “support more” without any understanding of what support is meant to be. This is completely incorrect and damaging. The muscle that gets involved here is the rectus abdominus and if you clench it, you will make it harder for your diaphragm descend when you breathe in. This means no release. Your song will be fine for a few phrases, but by the end of it you will be forcing.
How do I engage the correct support?
There are a considerable number of exercizes you can use. I will suggest a number of exercizes that will isolate each section, however as you improve, you will notice that each of these exercizes will engage with your entire support:
- “Hugging the Tree”
This exercize was suggested to me by a teacher who spent a lot of time performing in London. David L. Jones also uses a variant on his Introductory Lesson CD. You will mostly feel your obliques and lower back muscles activate:
- With your spine straight, bend your knees. Your spine should remain aligned from your tail bone to your skull. Do not let your bottom poke out too far
- Let your torso (abdomen and thorax as one unit) tilt forward slightly. Make sure your spine remains straight
- As if you were preparing to hug a tree, have your arms come out in front of you. You should be able to draw a large circle inside the hole made by your arms.
- On a ‘sssssssssss’, push your hands together in a prayer position. Try bending lower with your legs. You should feel like something ‘pushes outwards’ in your lower/mid back and/or side.
- Starting on a low note, gently vocalize (siren)“ssaaaaooooooooaaaaaaaaa”. The “aaaah” vowel should be used in the lower range and you should move to an “ooooh” as you go higher. Do not try to use vibrato or too much volume.
- When you sing higher notes, feel free to bend your knees more. Your back must ALWAYS be straight. Never let your bottom poke out. Instead, keep your pelvis tilted slightly forward.
- This is also an excellent movement for lip-trills. When you are warming up the voice with lip-trills, use this exercize for some of them. Bend lower when you ascend.
- “Hands on sides”
This exercize was recommended to me by a Jazz teacher. It is one that I have always kept with me and it is exceptional for getting students to find out how their oblique muscles work.
- Put your hands on the soft, fleshy part just above your hips. If someone else were to poke you in that area it may tickle.
- Use the inner side of your thumb and index finger to push into the area
- Use short “ss”, “ss”, “ss”, “ss,”
- You will instantly feel your obliques kicking your hands outwards
- Now try the same thing on a “weeeeeee”, “weeeeee”, “weeeeee”! Or a “haah!” “haaah!” Try playing with different consonants.
- When you have practiced the exercize for a few weeks, try it on open vowels: “Ahhh! “Aah!” Aah!” “iiih!” “iiih!”
- Avoid performing this exercize through your passagio at first as it will involve more volume and air pressure than “hugging the tree”.
- If you are more advanced and you do not have any trouble transitioning, feel free to use this exercize anywhere in your range.
- “Hands on tummy”
This exercize will help you understand how your lower abdominal muscles can engage.
You will repeat the steps in “Hands on Hips” except you should poke your fingers into the abdomen approximately two centimeters under your tummy button. Your hands will be kicked outwards when you do the exercizes.
The kicking occurs because there is a sheet of muscle called the aponeurosis of the external oblique muscles. Basically this is a large sheet of tissue that attaches to your side muscles that encases your lower abdomen. When it kicks outwards, you can tell that your side and abdominal muscles are correctly activating.
Breathing, support and posture:
Here is my big disclaimer. If your posture is not correct, then forget any of the breathing and support exercizes. Your breathing and support system can only be accessed if your posture is correct. Please read the article on posture to get a better understanding of this.
This means:
- The back of the neck must be tall (as if you were being slightly suspended from the roof with a string attached to the back of your head)
- The chin, however, must not tuck itself into the neck. This will depress the larnyx.
- The chest must be out, but not puffed out. Think of your collar bone being a lot wider than you think it is.
- The pelvis should be tucked slightly forward. Always make sure you are doing this when you are keeping your chest broad and wide.
- The knees should be slightly bent.
- The shoulders should be in alignment with the ears.
- The ears should be over the shoulders.
- This posture can be transferred to sitting and lying down
If your posture is correct, your breathing and support will almost automatically become corrected. You will instantly notice changes in your muscles as you sing. This is why I say that you are allowing breath and support.
To summarize:
- At all times, your posture should be correct. If you have a correct posture, your ribs have room to release and remain open, your abdomen can relax and your correct support muscles can activate when you sing.
- When you breathe in, you are releasing. Your abdominal muscles are relaxed at this point, but prepared to become active.
- When you begin singing, you are supporting. with the correct abdominal, side, back and rib muscles. Your diaphragm is relaxing. This relaxation is slowed down and controlled by your support muscles.
As you become better equipped to correctly go through these steps, you will find that the process is extremely simple.
